
Higher Ed Video 101: Camera Settings, Audio, and Lighting for In-House Teams
By John Azoni, founder of Unveild — a video production company for higher education.
TL;DR:
If your footage looks like a news broadcast and your audio sounds like you recorded in an echoey bathroom, this episode's for you. John walks in-house higher ed videographers through the camera settings that actually matter — frame rate, aperture, shutter speed, ISO — plus why he shoots in auto white balance (and doesn't care who knows it), why log footage is probably creating more problems than it's solving for your team, and why bad audio will tank a video faster than any camera setting ever could. The throughline: you're not just making videos, you're building an asset library other departments have to use. Make decisions accordingly.
If you picked up a camera kind of accidentally — maybe it was part of your job description, maybe you just started dabbling — this is for you. And honestly, even if you've been doing this for a bit and you're still not totally sure why your footage doesn't look as good as you want it to, this is for you too.
This isn't a deep technical breakdown. I'm not gonna explain bitrates or individual pixel density or whatever. What I am gonna do is walk you through the settings and decisions that actually make a difference on video quality — and talk about why some of the "professional" approaches don't always make sense for the way in-house higher ed teams actually work.
Frame Rate: The Setting That Changes How Your Footage Feels
If your video looks weirdly like a news broadcast — clean, but kind of clinical — the culprit is probably your frame rate.
Most cameras default to 30fps, and there's nothing wrong with that technically. But 30fps has this hyper-real quality that just doesn't read as cinematic. Breaking Bad, Yellowstone, The Pitt — that's all shot at 24fps. That's one piece of why it looks the way it looks.
At 24fps, each frame captures just enough natural motion blur to make your brain go "oh, that's a movie." Exactly why that works, I couldn't tell you. But it does. Brains be brainin’.
So if you've been defaulting to 30fps without thinking about it, go change that right now. Almost every camera — including your iPhone — lets you adjust this. It's one of the single biggest upgrades you can make to the feel of your footage.
The one exception: 60fps is great when you're shooting something you're gonna slow down in the edit. Confetti drop, athlete crossing the finish line, crowd going crazy. Shoot that at 60fps so the slow motion is smooth. Shoot it at 24fps and try to slow it down and it's gonna look choppy and rough.
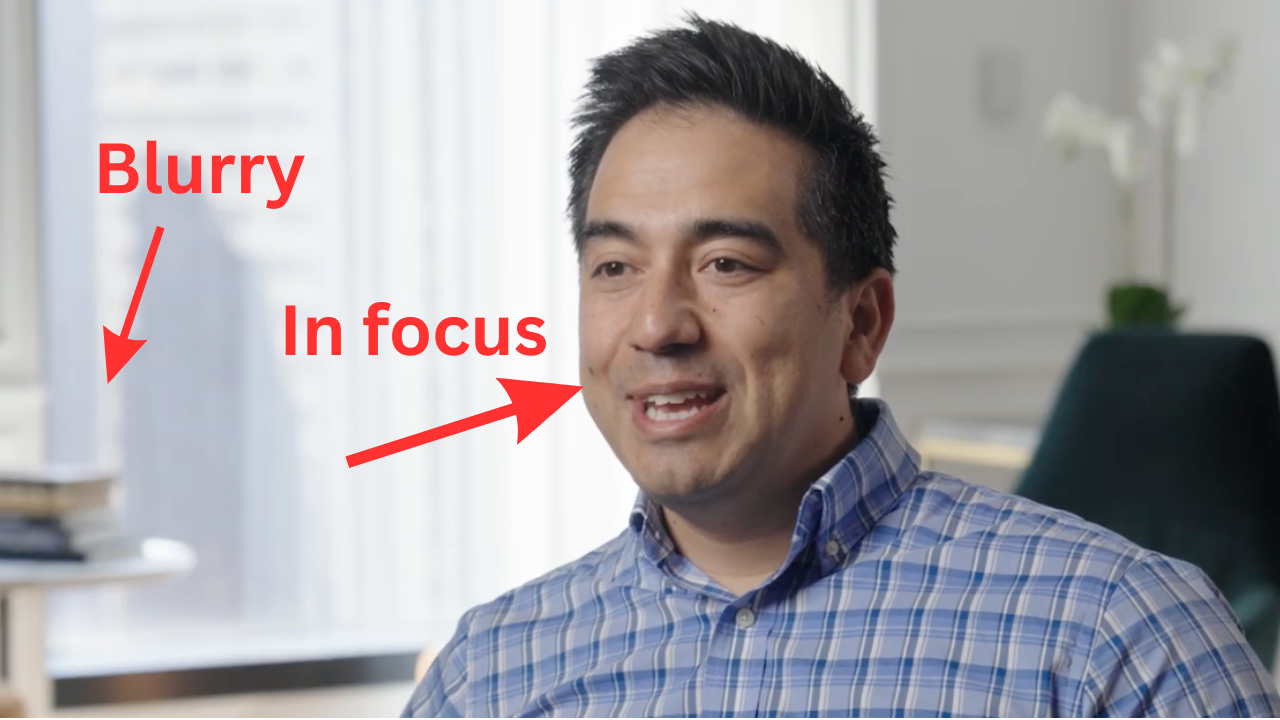
Aperture: How to Get That Blurred Background Look
Aperture controls how wide open your lens is — and it has a huge effect on two things: how much light comes in, and how much of your image is in focus.
It's measured in “f-stops” (I have no idea what f-stop means). The lower the number, the wider the opening. A wide aperture like f/1.8 or f/2.8 is what creates that blurred background portrait effect. Your subject is sharp, everything else falls soft. It's cinematic, it looks intentional, and it's what separates a produced piece from someone just pointing a camera at people.
The tradeoff: the wider your aperture, the shallower your focus range. So if your subject moves significantly toward or away from the camera, they can drift out of focus. For interview-style shooting, this usually isn't a problem. For something like a dance performance where someone's constantly moving and changing distance from your lens, you probably want to stop down to a higher f-stop so more of the scene stays in focus. You'll lose some background blur, but you'll also stop chasing focus the whole time.
For cheaper lenses, the widest you can go is usually around f/3.5 or f/4. Better “glass” (fancy name for lenses… say glass and you’ll sound cool) gets you to f/2.8 or wider. Either way, shoot at the lowest number your lens allows.
Shutter Speed: There's Really Just One Rule
Set your shutter speed to twice your frame rate. That's it.
Shooting at 24fps? Set your shutter to 1/48 or 1/50, whatever your camera offers closest to that. Shooting at 60fps? Set it to 1/120.
Deviate from this and you'll either get choppy, harsh footage (shutter too fast) or unnatural motion blur (shutter too slow).
Where it gets complicated is outdoors in bright sunlight. If you're keeping your aperture wide open for that blurred background look, you've got a lot of light coming in, and if you don't compensate, your image is gonna be blown out. The pro solution is a neutral density filter — basically sunglasses for your lens. It cuts the light coming in without affecting anything else, so you can keep your aperture wide and your shutter speed correct.
Some cameras also offer shutter angle as a setting. If yours does, set it to 180 degrees and you literally never have to think about shutter speed again — it automatically stays at twice your frame rate no matter what. That's how we run it at Unveild.
ISO: Brightness vs. Grain
ISO controls your sensor's sensitivity to light. Higher ISO = brighter image, but also more grain.
Every camera has a "native ISO" — usually around 400 or 800 — where it produces the cleanest image. Start there and only push it higher when you genuinely don't have enough light. Know that when you do push it, you're trading some image quality to get there. But on most cameras it’s not even noticeable until you start pushing beyond 1250.
For most indoor environments — classrooms, offices, that kind of thing — you'll probably land around 1200–1600 ISO and be totally fine. The best way to figure out your own camera's limit is to just test it: go into a dim room, record, and keep bumping the ISO up until you start seeing grain. Now you know your ceiling.
These three settings — aperture, shutter speed, and ISO — are what's called the exposure triangle. They all interact with each other, and learning to balance them takes some practice. Spend 30–60 minutes on YouTube just learning how they work together. It's worth it.
Resolution: Shoot 4K, Edit 1080p
4K as a final output isn't really necessary for most of what you're putting on YouTube, Instagram, or an admissions website. Those platforms compress the video anyway.
But shooting 4K and editing in a 1080p timeline gives you a ton of flexibility. You can zoom in, reframe, stabilize slightly shaky shots — all without losing quality. It's less about what the viewer sees and more about what you're giving yourself (or your editor) to work with.
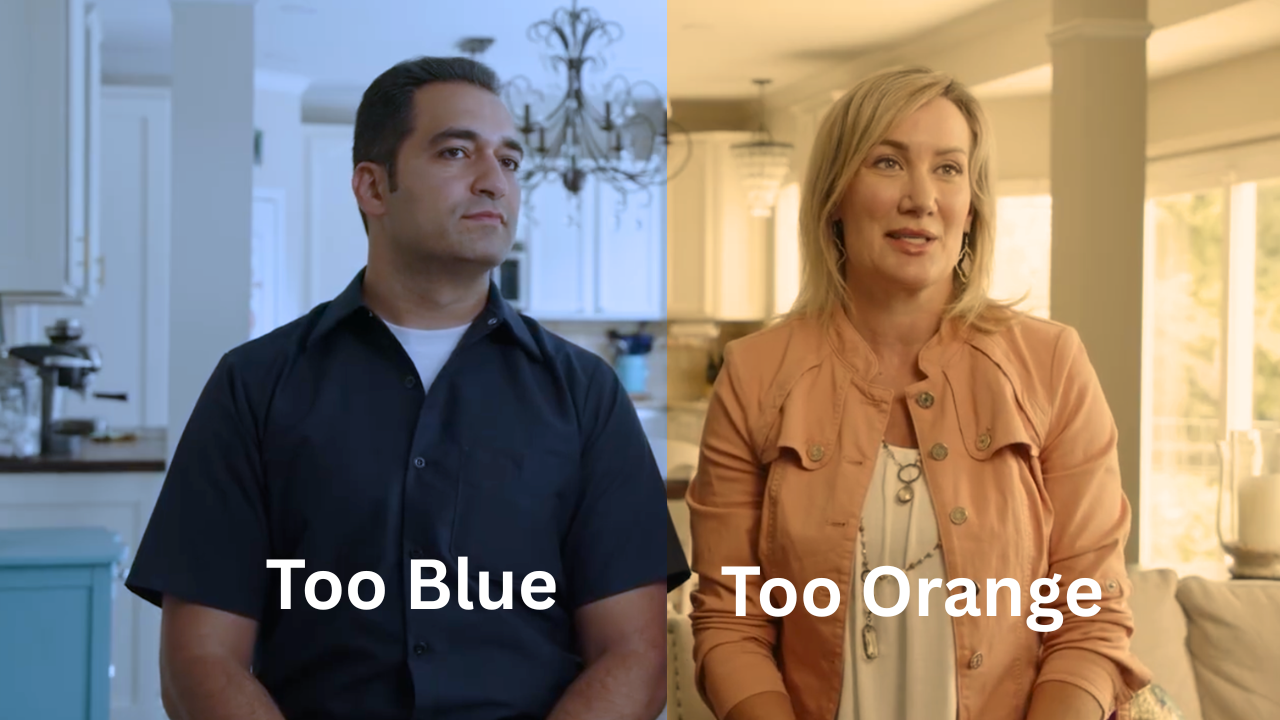
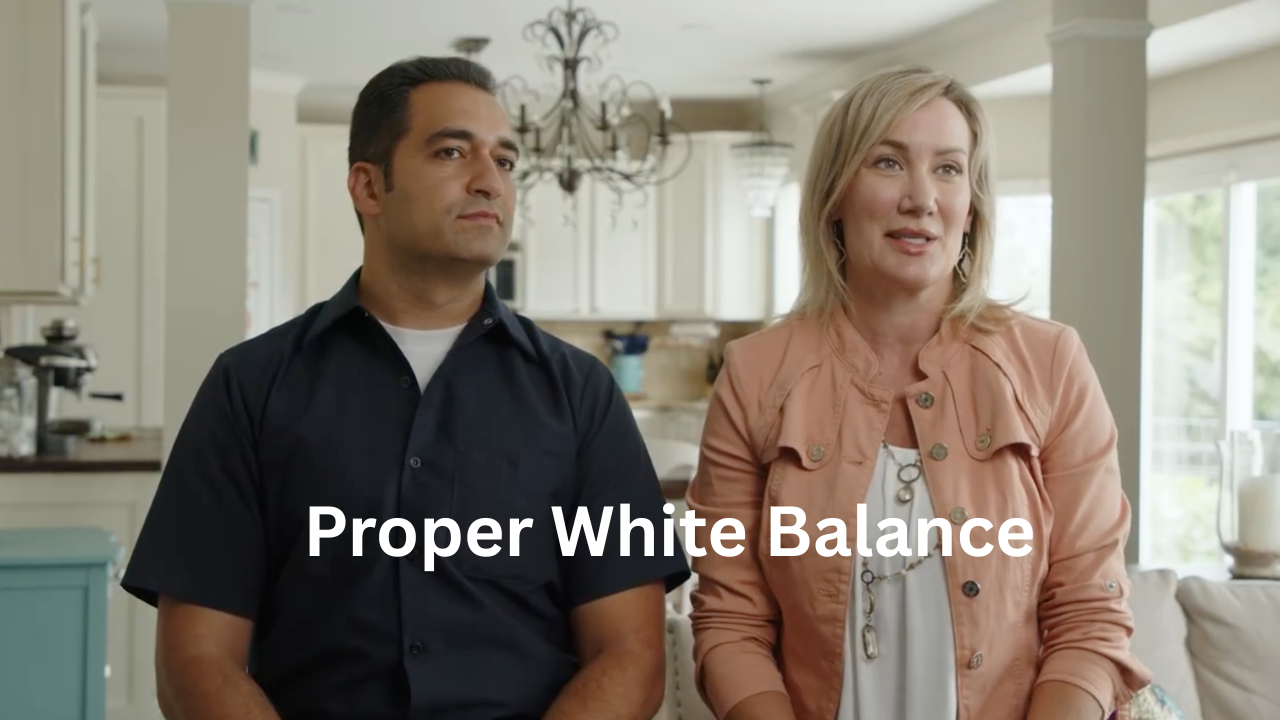
White Balance: Just Use Auto
I know the purists are clutching their pearls right now. But for in-house teams moving between environments — indoor tungsten (orange), outdoor daylight (blue), mixed classroom lighting — auto white balance is gonna keep you out of more trouble than manual will. The risk of forgetting to switch your white balance going from outside to inside and ending up with unusable orange footage is a real one. Auto takes that variable off the table, even if you lose a little control over dialing in the perfect white balance. But for what most in-house teams are shooting, auto white balance (AWB) is going to get you close enough.
Keep everything else manual. Aperture, shutter speed, ISO — the camera doesn't know the look you're going for and will make creative decisions you don't want if you let it. White balance is the one exception.
Log Footage: Probably Not Worth It for Your Workflow
This is where I tend to get some pushback, but hear me out.
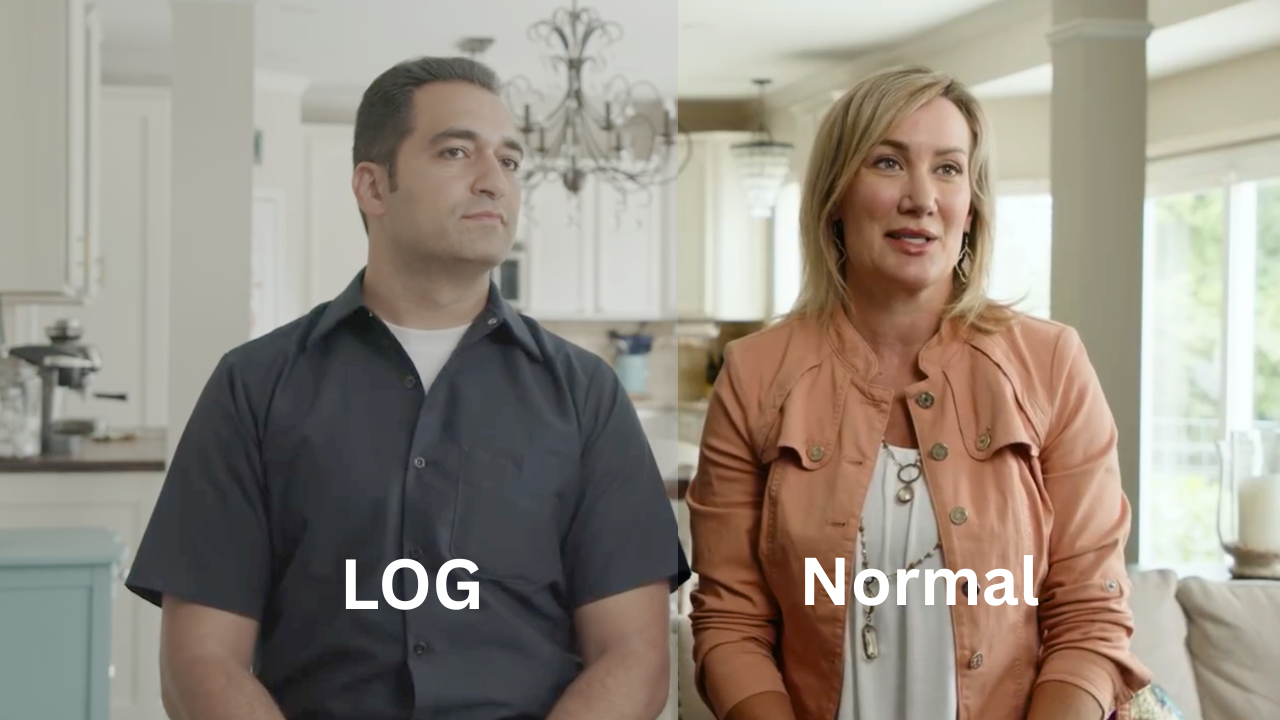
Log is a color profile that captures intentionally flat, desaturated footage so you have more flexibility in post when you're doing color grading. Outsourced video partners shoot in log almost by default. In a controlled, high-end production, it makes sense.
For most in-house higher ed teams, it creates more problems than it solves.
First, log footage has to be color graded before it looks usable — and that's a real time investment, especially if you're a one or two-person team already managing a high volume of content. Second, and this one matters a lot: your asset library. When an admissions counselor or your social media team grabs a clip from the shared drive, they're gonna download flat, gray, washed-out footage. They won't know why it looks wrong. Some of them will just post it. I've seen it happen.
If you're lighting and exposing correctly, you don't need log to get great results. Find a color profile your camera offers that looks finished to your eye, bake it in, and focus your energy on getting the fundamentals right in-camera. Save log for the occasional high-stakes production where the extra workflow is actually worth it.
Stabilization: Two Opposite Mistakes
The first mistake is micro jitter — that high-frequency hand tremor you get when you're zoomed in and holding the camera without stabilization (like a tripod or a gimbal). It doesn't look like artsy cinematic handheld footage. It just looks like 💩. If your camera or lens doesn't have optical stabilization, get on a tripod or monopod.
The second mistake is going overboard with a gimbal. Once people get their first gimbal, suddenly everything becomes this floating, circling, Michael Bay thing. For most of the content in-house higher ed teams are producing — student stories, campus culture, admissions-focused pieces — the camera should serve the story. A clean, locked-off or subtly handheld shot keeps attention on the person, not on the production. Gimbals have their place. Just not everywhere.
Lighting: Soft vs. Hard, and Why It Matters
Hard light comes from a small, direct source — bare bulb, direct sun — and it creates harsh shadows and unflattering textures. Soft light is diffused and wraps around your subject. It's the difference between noon sun and an overcast day.
If you don't have external lights, a window is your best friend. Position your subject so the window is off to the side rather than straight behind the camera, and you'll have natural, soft, flattering light for free.
When you're ready to invest in a dedicated light, the Amaran 300X paired with a large umbrella soft box is worth every dollar. It's adjustable for color temperature, which is incredibly useful in mixed lighting environments like a college campus, and it'll last you for years.
Audio: Honestly More Important Than the Camera
Bad audio makes people stop watching. Full stop. It might actually matter more than image quality.
A few things worth knowing: always use an external microphone, never the built-in camera mic. And when you can, record that audio directly into the camera. There's a school of thought that says you should record to a separate audio recorder for better quality — technically fine, but it creates a syncing problem in post, and it means anyone else who grabs that footage is gonna grab a clip with terrible audio because the good audio is on a different device somewhere.
Keep it simple. Run your mic into the camera, watch your audio meter, and don't let it peak into the red. If someone laughs unexpectedly or turns out to be a loud talker, that's when things clip and distort. Glance at the meter.
One more thing: hide the mic. A big black wireless box clipped to someone's collar is distracting and it looks unfinished. Use a lavalier wire and tuck it, or use a shotgun mic that stays out of frame. Either option looks a lot more intentional than a visible black box on someone's chest.
The Bigger Picture
All of these decisions aren't just about making one video look good. They're about building a system where other people — admissions, social, whoever — can actually access and use your footage without needing you to process it first.
The choices you make as a videographer, viewed through a systems lens, are different than the choices a solo filmmaker would make. You're not just capturing video. You're building an asset library that other departments depend on. Set it up so they can use it.
Want to hear all of this with more commentary and context? Listen to the full episode on the Higher Ed Storytelling University podcast at unveild.tv/podcast/ep107.
Want more insights on Content Creation and STrategy in higher ed?
Join my free weekly newsletter.👇
Brian Piper (Author, Epic Content Marketing for Higher Education) : “The Higher Ed Storyteller’s Digest is one of those emails that I open as soon as it comes in. John does an amazing job of summarizing the content so you can jump right into what is most relevant to you. I love that he features best practices, key takeaways from the latest podcast episode, and there are always some interesting video clips or memes in there for a laugh.”